Tag: DIY Modding

  • PS3 Slim Pro Mod with Noctua Fans Runs Under 30 dB: Reddit Reactions

    PS3 Slim Pro Mod with Noctua Fans Runs Under 30 dB: Reddit Reactions

    Key Takeaways

    1. Introduction of PS3 Slim Pro: A Reddit user created a hand-made PS3 Slim Pro with improved cooling and a custom shell for quieter operation.

    2. Cooling System and Performance: The mod features dual Dell server heatsinks and Noctua fans, achieving temperatures around 51 °C while playing games, significantly lower than the original PS3.

    3. Community Praise: The project received admiration from the Reddit community for its craftsmanship and cooling efficiency, showcasing the creator’s skills in building the custom enclosure.

    4. Budget-Friendly Project: The creator highlighted that the DIY project was cost-effective, with parts totaling around $35, emphasizing patience as a key factor in the build.

    5. Mixed Reactions: While many praised the design and performance, some users preferred the original PS3 look, leading to discussions about aesthetics versus functionality.


    In the past few months, it seems like PlayStation consoles have become a popular choice for DIY enthusiasts. Following Zac Builds’ water-cooled “PS3 Pro” that could run Gran Turismo 6 at 60 FPS and Not From Concentrate’s Tiny PS5 Redux, which compacted the PS5 into a 6-litre aluminum shell, another creator has emerged with a fascinating blend of both generations.

    Introduction of the PS3 Slim Pro

    Reddit user Fun-Equivalent-7785 has introduced a hand-made PS3 Slim Pro, which is a complete overhaul of the 2009 system, featuring enhanced thermal management and a custom shell that aims to operate more quietly and at cooler temperatures than the original hardware.

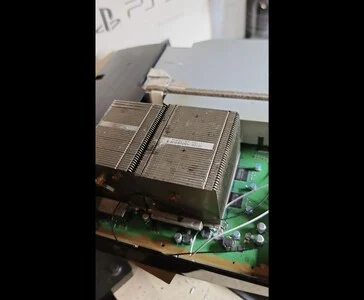
    The adventure began with a post in the r/PS3 subreddit called “PS3 Slim Pro Project.” The initial image presented a detailed view of a Dell server heatsink affixed to the PlayStation 3 motherboard.

    Showcasing the Finished Product

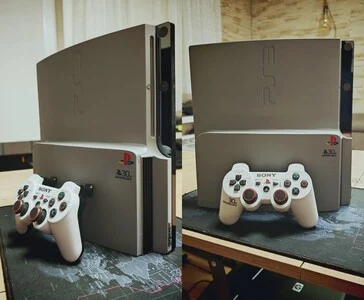
    After two days, the same Redditor presented their finished creation, revealing the actual appearance of the PS3 Slim Pro. Dressed in a matte silver-grey with black details and a special “30th Anniversary” PlayStation logo, the console boasted two large Dell server heatsinks, dual 60 mm Noctua fans, and components that were undervolted and overclocked. While playing The Last of Us, it maintained temperatures around 51 °C on both the RSX and Cell chips after three hours, functioning nearly silently, as mentioned in the post.

    The post received even more admiration from the r/PS3 community, where users praised both the cooling system and the skill displayed in the handmade case. One user, HoloKola_, remarked, “Props to you, I can’t even imagine how you did the shell, it looks perfect.” The builder, Fun-Equivalent-7785, responded that the casing was entirely handcrafted using parts from another PS3 Slim, which were cut, trimmed, glued, sanded, and spray-painted into their final form.

    Feedback and Further Improvements

    Another commenter noted, “Looks great. I wish I were as skilled as you with this kind of stuff,” to which the modder replied that the project was budget-friendly and mainly required patience, stating that the heatsinks cost about $5, and the vents and shell totaled around $30.

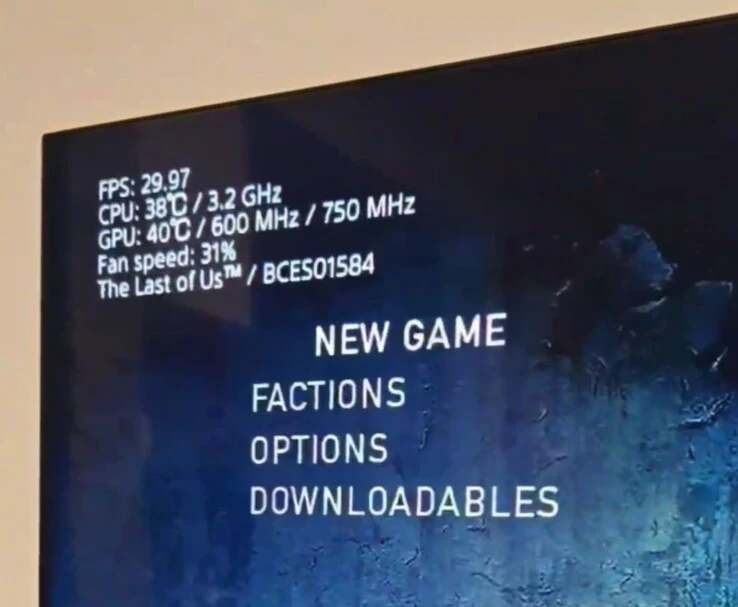
    Days later, the creator posted another update, revealing even better temperatures from their modified PS3, which, when tested without a case and with the same cooling setup, reached 38 °C on the CPU and 40 °C on the GPU.

    Shortly after, they shared another post indicating that with the case in place, the PS3 Slim Pro recorded noticeably higher temperatures, hitting around 52 °C on both the CPU and GPU.

    On November 6, 2025, the creator finally showed off their complete build. Centered around Sony’s PlayStation 3 CECH-2504 C0 motherboard, the mod utilizes two Dell server heatsinks and dual 60 mm Noctua fans connected through the PS3’s PWM controller for automatic fan speed adjustments. Both the Cell and RSX chips are undervolted by -100 mV to lower heat, and the RSX is slightly overclocked to 600 MHz core / 875 MHz memory. The cooling solution is enhanced with thermal pads, gel, and Honeywell PTM7950 TIM to cover the VRMs, NAND memory, and PSU area.

    Community Reactions

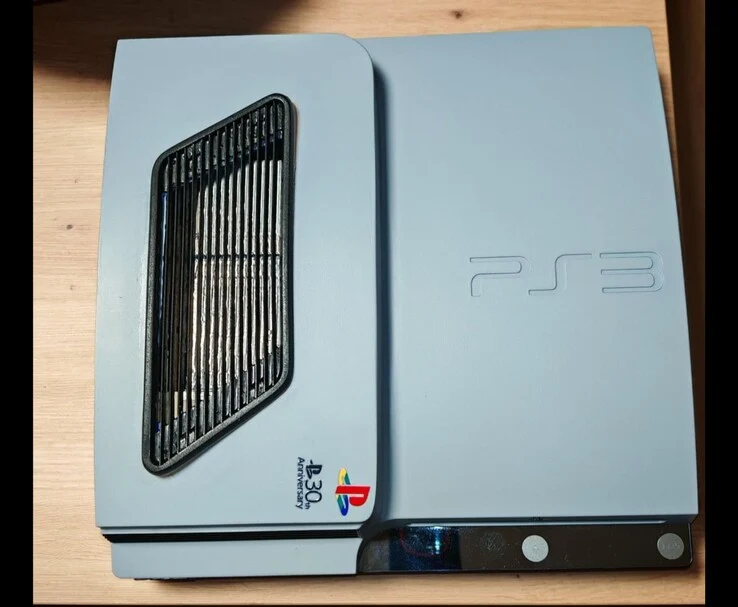
    The custom handmade enclosure, crafted without the use of 3D printing, has airflow openings designed to reduce turbulence. At approximately 30 dB, the console is much quieter than the standard PS3, based on the creator’s measurements. Storage has been upgraded to a 1 TB Samsung 850 Pro SSD, with radiators mounted on the original clamps for a neat, factory-like finish.

    Reddit users applauded the craftsmanship and sound performance of the build. One user, Maximum-Neat4532, commented, “Bro, this is so beautiful,” to which the creator simply replied, “Thx bro.” Another user, Dario-Argento, expressed a desire to pay for such a creation, prompting the modder to state that they only build for personal enjoyment: “I’m an enthusiast… maybe someday.”

    Others chimed in with humor and nostalgia, with user RhinoxMenace joking, “NOOOO BUT THE SONY ENGINEERS KNOW BETTER… that’s why the PS4 sounded like a jet engine after three months of use — because experts,” which garnered many upvotes and a laughing response from the creator. Meanwhile, MiaowMinx noted that “a PS4 should only sound like a jet engine if it needs to be opened up and cleaned.”

    Nonetheless, not everyone approved of the new PS3 case design featuring the grilles, as some preferred the original look. In response, the creator pointed out that the temperatures were much improved, which was the reason for the design change.

    Source:
    Link


  • YouTuber Creates iPadBook: M4 iPad Pro Meets MacBook Display

    YouTuber Creates iPadBook: M4 iPad Pro Meets MacBook Display

    Key Takeaways

    1. iPadBook Prototype: Shu Chan created a DIY hybrid called the “iPadBook” that uses an M4 iPad Pro as the main display for a MacBook Air by replacing its original screen.

    2. Unique Display Functionality: The iPad acts as the sole monitor for macOS, allowing users to run desktop applications and utilize touch and Apple Pencil features directly on the iPad.

    3. MagBaka System: The device features a magnetic alignment system called “MagBaka,” which uses 12 hidden magnets to securely align and hold the iPad in place with the MacBook base.

    4. Custom Crafting Process: Shu Chan repurposed parts from a damaged MacBook Air, engineered a custom docking base, and used a 3D printer for multiple prototypes to create the housing for the iPadBook.

    5. Future Improvements: Plans for the iPadBook include adding internal cable storage and experimenting with retro designs, as well as potential upgrades using more powerful chips in future versions.


    YouTuber and hardware enthusiast Shu Chan has developed a working prototype named the “iPadBook.” This DIY hybrid transforms an M4 iPad Pro into a detachable tablet and serves as the main display for a MacBook Air.

    Simple Concept

    The concept was quite simple: remove the MacBook Air’s original screen and replace it with an M4 iPad Pro. According to the YouTuber, when the iPad is docked, it connects to the MacBook Air using a wired Sidecar setup. Normally, Sidecar either extends or mirrors the Mac’s display to the iPad, but in this case, the absence of a built-in screen in the MacBook Air allows the iPad to become the only active display for macOS.

    Unique Features

    When macOS starts up, it recognizes the iPad as its sole monitor. This allows users to run applications, interact with the desktop, and utilize touch and Apple Pencil features directly on the iPad. It can handle full desktop applications like Final Cut Pro, Photoshop, and Microsoft Office. Plus, the Apple Pencil can be used for designing or editing tasks.

    In this configuration, macOS operates on an M1 MacBook Air base, while the display component is an M4 iPad Pro that utilizes its own M4 chip when it is detached.

    Standalone Functionality

    When separated from the base, the iPad functions as a standalone tablet suitable for media consumption or gaming. Shu Chan has also crafted a custom macOS Shortcut that enables the MacBook’s keyboard and trackpad to work with the iPad, ensuring a smooth typing and navigation experience.

    Shu Chan refers to the magnetic alignment system as “MagBaka” (pronounced “Mag-bah-kah”), a whimsical name for the embedded magnets and locking design that maintains the alignment of the iPad with the MacBook base. This system incorporates 12 hidden magnets that automatically align the tablet and secure it firmly.

    Crafting Process

    To make this work, Shu Chan repurposed the hinge from a damaged MacBook Air, engineered a custom docking base, and 3D-printed several prototypes of the housing using a Bambu Lab H2D printer. The design features 12 built-in magnets to ensure the iPad stays securely in place, a raised typing angle for better comfort, and a slight lift to the MacBook Air’s base when opened to enhance cooling without the need for a fan.

    Shu Chan mentions that the build process involved over a dozen print attempts. The H2D’s sizable 350 × 320 × 325 mm build area allowed for the 13-inch iPad Pro housing to be printed in one go. The printer is capable of laser engraving and precision-cutting, and Shu Chan took advantage of these features to add custom graphics on the back cover of the iPadBook and create personalized stickers.

    Future Aspirations

    Looking ahead, Shu Chan plans to incorporate internal cable storage for a tidier wired Sidecar connection and is interested in experimenting with retro cases, like reusing an iBook G3 shell, to blend modern technology with vintage aesthetics.

    Shu Chan points out that the M4 iPad Pro’s chip is more powerful than the M1 in the MacBook Air base, and suggests that a future redesign utilizing an M4 Max MacBook Pro board could turn the iPadBook into a significantly more capable device. They credit the functionality of the Bambu Lab H2D and the MakerWorld community for assisting in making this idea a reality.

    The build video by Shu Chan on YouTube is in Mandarin Chinese, and currently, there’s no English translation available. However, even for those who don’t speak the language, it can be enjoyable to watch a dedicated modder create something impressive. Check out the video linked below.

    Source:
    Link


  • Steam Deck Transformed into Compact Bento Keyboard-PC

    Steam Deck Transformed into Compact Bento Keyboard-PC

    Key Takeaways

    1. Innovative Design: Bento is a DIY project that integrates a complete Steam Deck setup within a wireless keyboard, featuring a battery and fan for a compact AR display solution.

    2. Unique Display Method: Instead of a traditional screen, Bento uses display glasses connected via a dongle, keeping the keyboard shell tidy and compact.

    3. Creative Rebuild Process: The creator disassembled a Steam Deck and reconstructed it using a 3D-printed housing, facing challenges with ventilation and component fitting.

    4. Nostalgic Aesthetic: The design has a retro feel, reminiscent of the classic Commodore 64, appealing to fans of vintage tech.

    5. Future Enhancements Planned: The project is ongoing, with plans for interchangeable input modules, improved case design, and a product demo video.


    Reddit user u/michaelthatsit is attracting quite a bit of interest within the Steam Deck modding scene with an innovative and tidy DIY project known as Bento. At first, it appears to be just a regular wireless keyboard. However, when you open it up, you’ll find a complete Steam Deck setup inside, including a fan, a battery, and everything needed to power a wearable AR display.

    Unique Display Solution

    Rather than utilizing a conventional screen, Bento employs a pair of display glasses that receive video through a dongle located within the case. This design choice keeps the keyboard shell neat and compact. Additionally, the overall layout showcases some smart design choices. For instance, there’s a specially carved area on the right side that functions as a “bento” tray for the dongle and potentially for future mouse attachments.

    Creative Rebuild Process

    To achieve this design, the creator completely disassembled a Steam Deck and reconstructed it into a two-part 3D printed housing. Ventilation was added to both the top and right sides, although it is said that cooling might still be an issue due to limited space—a problem the designer intends to fix in the next version.

    Most of the build was designed and refined using Shapr3D, with numerous failed prints during the process. Components were obtained from eBay, and the entire idea originated from observing how well the internals of a Steam Deck could fit within the dimensions of a keyboard. The design has a nostalgic feel, reminiscent of the classic Commodore 64.

    Future Developments on the Horizon

    What’s fascinating is that this project is still in the works, with hints of future improvements such as interchangeable input modules and a more robust case for the electronics. There are also plans for a product-style demo video once everything is finalized.

    Source:
    Link